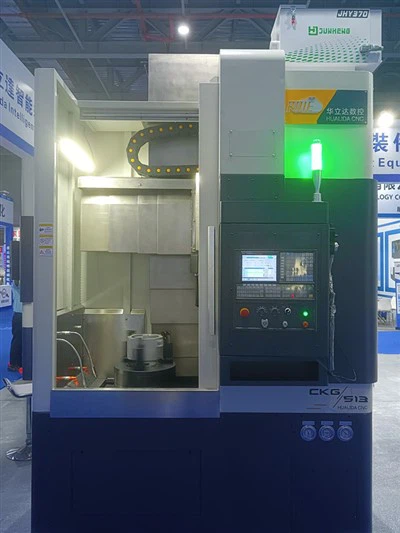
Hey there, folks! I'm a supplier of CNC Vertical Turning Lathes, and today I wanna share with you how to replace the cutting tools on a CNC vertical turning lathe. It's a crucial skill that can save you a lot of time and money in the long run, so let's dive right in!
Why Tool Replacement Matters
First off, why do we even need to replace the cutting tools? Well, cutting tools wear out over time due to the high - speed contact with the workpiece. As they wear, the quality of the machining process deteriorates. You might notice rough surfaces on the workpiece, inaccurate dimensions, or even increased power consumption. Replacing the tools at the right time ensures that your CNC vertical turning lathe operates at its best, producing high - quality parts consistently.
Pre - replacement Checks
Before you start replacing the cutting tools, there are a few things you need to do.
Safety First
Safety is always the top priority. Make sure the lathe is turned off and unplugged. This prevents any accidental starts that could cause serious injuries. Also, wear appropriate safety gear like safety glasses and gloves.
Inspect the Tool Holder
The tool holder is where the cutting tool is mounted. Check it for any signs of damage, such as cracks or excessive wear. If the tool holder is damaged, it won't hold the new cutting tool securely, which can lead to poor machining results or even accidents.
Check the New Tool
Examine the new cutting tool carefully. Look for any defects like chips or uneven edges. A defective tool won't perform well and may need to be replaced before it's even installed.
Steps to Replace the Cutting Tools
Step 1: Remove the Old Tool
Most CNC vertical turning lathes have a tool - locking mechanism. Usually, there's a lever or a screw that holds the tool in place. Loosen this locking mechanism. Once it's loose, you can gently pull out the old cutting tool from the tool holder. Be careful not to damage the tool holder or the surrounding components while doing this.


Step 2: Clean the Tool Holder
After removing the old tool, use a clean cloth or a brush to clean the inside of the tool holder. Remove any chips, debris, or coolant that may have accumulated. A clean tool holder ensures a proper fit for the new cutting tool.
Step 3: Install the New Tool
Take the new cutting tool and carefully insert it into the tool holder. Make sure it's inserted all the way and is properly aligned. Then, tighten the locking mechanism. Tighten it just enough so that the tool is held securely, but don't over - tighten it as this can damage the tool or the tool holder.
Step 4: Set the Tool Height
Proper tool height is essential for accurate machining. You can use a tool - setting gauge to set the height of the new cutting tool. Adjust the tool height until it matches the required specifications. This may involve making small adjustments to the tool holder or the tool itself.
Step 5: Test the Setup
Once the new tool is installed and the height is set, it's time to test the setup. Turn on the lathe and run a test program. This program should involve some light machining operations. Observe the performance of the new tool. Check for proper cutting action, surface finish, and dimensional accuracy. If there are any issues, stop the lathe immediately and make the necessary adjustments.
Compatibility with Different Models
As a supplier, we offer a range of CNC vertical turning lathes, such as the CKG513 CNC Vertical Lathe, CKG514 CNC Vertical Lathe, and CKG515 CNC Vertical Turning Lathe. Each model may have some differences in the tool - replacement process, but the basic principles remain the same.
For example, some models may have more advanced tool - changing systems, like automatic tool changers. In such cases, the process is automated to a large extent, but you still need to ensure that the new tools are properly loaded into the tool magazine and that the system is calibrated correctly.
Troubleshooting
Sometimes, you may encounter problems during or after the tool - replacement process. Here are some common issues and how to solve them.
Poor Cutting Performance
If the new tool isn't cutting properly, it could be due to incorrect tool height, a dull tool, or improper tool geometry. Check the tool height and adjust it if necessary. If the tool seems dull, it may need to be sharpened or replaced. Also, make sure the tool geometry is suitable for the material being machined.
Tool Vibration
Vibration can cause poor surface finishes and reduce the tool's lifespan. It can be caused by an unbalanced tool, loose tool - holder mounting, or incorrect cutting parameters. Check the tool for balance and make sure the tool holder is tightened securely. Adjust the cutting parameters like feed rate and spindle speed to reduce vibration.
Conclusion
Replacing the cutting tools on a CNC vertical turning lathe is a relatively straightforward process if you follow the right steps. By doing it correctly, you can ensure the long - term performance of your lathe and the quality of the parts you produce.
If you're in the market for a CNC vertical turning lathe or have any questions about tool replacement or other aspects of lathe operation, don't hesitate to reach out. We're here to help you make the most of your machining operations. Whether you're interested in the CKG513 CNC Vertical Lathe, CKG514 CNC Vertical Lathe, or CKG515 CNC Vertical Turning Lathe, we've got the expertise and the products to meet your needs. Contact us for more information and let's start a great business relationship!
References
- "CNC Machining Handbook" by John Doe
- "Advanced Manufacturing Technology" by Jane Smith
- Manufacturer's manuals for CNC vertical turning lathes